
Helix Tutorial: Task Framework
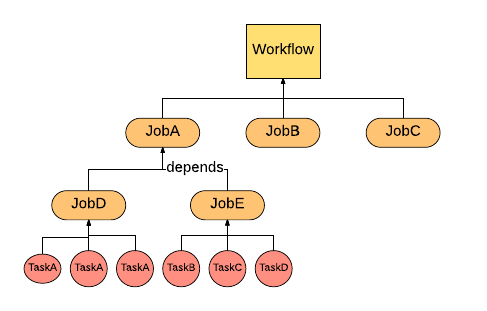
Task framework, in Helix, provides executable task scheduling and workflow management. In Helix, three layers of task abstraction have been offered to user for defining their logics of dependencies. The graph shows the relationships between three layers. Workflow can contain multiple jobs. One job can depend on other one. Multiple tasks, including same task different partition and different task different partition, can be added in one job. Task framework not only can abstract three layers task logics but also helps doing task assignment and rebalancing. User can create a workflow (or a job queue) at first beginning. Then jobs can be added into workflow. Those jobs contain the executable tasks implemented by user. Once workflow is completed, Helix will schedule the works based on the condition user provided.
Key Concepts
- Task is the smallest unit of work in Helix Task Framework. It represents a single runnable logics that user prefer to execute for each partition (distributed units).
- Job defines one time operation across all the partitions. It contains multiple Tasks and configuration of tasks, such as how many tasks, timeout per task and so on.
- Workflow is a directed acyclic graph that represents the relationships and running orders of Jobs. In addition, a workflow can also provide customized configuration, for example, Job dependencies.
- JobQueue is another type of Workflow. Different from normal one, JobQueue is not terminated until user kill it. Also JobQueue can keep accepting newly coming jobs.
Implement Your Task
Task Interface
The task interface contains two methods: run and cancel. User can implement his or her own logic in run function and cancel / roll back logic in cancel function.
public class MyTask implements Task {
  @Override
  TaskResult run() {
    // Task logic
  }

  @Override
  void cancel() {
    // Cancel logic
  }
}
TaskConfig
In helix, usually an object config represents the abstraction of that object, such as TaskConfig, JobConfig and WorkflowConfig. TaskConfig contains configurable task conditions. TaskConfig does not require to have any input to create a new object:
TaskConfig taskConfig = new TaskConfig(null, null, null, null);
For these four fields:
- Command: The task command, will use Job command if this is null
- ID: Task unique id, will generate a new ID for this task if input is null
- TaskTargetPartition: Target partition of a target. Could be null
- ConfigMap: Task property key-value map containing all other property stated above, such as command, ID.
Share Content Across Tasks and Jobs
Task framework also provides a feature that user can store the key-value data per task, job and workflow. The content stored at workflow layer can shared by different jobs belong to this workflow. Similarly, content persisted at job layer can shared by different tasks nested in this job. Currently, user can extend the abstract class UserContentStore and use two methods putUserContent and getUserContent. It's similar to HashMap put and get method except for the additional param Scope. The Scope defines which layer this key-value pair to be persisted.
public class MyTask extends UserContentStore implements Task {
  @Override
  TaskResult run() {
    putUserContent("KEY", "WORKFLOWVALUE", SCOPE.WORKFLOW);
    putUserContent("KEY", "JOBVALUE", SCOPE.JOB);
    putUserContent("KEY", "TASKVALUE", SCOPE.TASK);
    String taskValue = getUserContent("KEY", SCOPE.TASK);
  }
 ...
}
Return Task Results
User can define the TaskResult for a task once it is at final stage (complete or failed). The TaskResult contains two fields: status and info. Status is current Task Status including COMPLETED, CANCELLED, FAILED and FATAL_FAILED. The difference between FAILED and FATAL_FAILED is that once the task defined as FATAL_FAILED, helix will not do the retry for this task and abort it. The other field is information, which is a String type. User can pass any information including error message, description and so on.
TaskResult run() {
    ....
    return new TaskResult(TaskResult.Status.FAILED, "ERROR MESSAGE OR OTHER INFORMATION");
}
Task Retry and Abort
Helix provides retry logics to users. User can specify the number of task failures to allow under a job. It is a method will be introduced in Following Job Section. Another choice offered to user that if user thinks a task is very critical and do not want to do the retry once it is failed, user can return a TaskResult stated above with FATAL_FAILED status. Then Helix will not do the retry for that task.
return new TaskResult(TaskResult.Status.FATAL_FAILED, "DO NOT WANT TO RETRY, ERROR MESSAGE");
TaskDriver
All the control operation related to workflow and job are based on TaskDriver object. TaskDriver offers several APIs to controller, modify and track the tasks. Those APIs will be introduced in each section when they are necessary. TaskDriver object can be created either by HelixManager or ZkClient with cluster name:
HelixManager manager = new ZKHelixManager(CLUSTER_NAME, INSTANCE_NAME, InstanceType.PARTICIPANT, ZK_ADDRESS);
TaskDriver taskDriver1 = new TaskDriver(manager);

TaskDriver taskDriver2 = new TaskDriver(zkclient, CLUSTER_NAME);
Propagate Task Error Message to Helix
When task encounter an error, it could be returned by TaskResult. Unfortunately, user can not get this TaskResult object directly. But Helix provides error messages persistent. Thus user can fetch the error messages from Helix via TaskDriver, which introduced above. The error messages will be stored in Info field per Job. Thus user have to get JobContext, which is the job status and result object.
taskDriver.getJobContext("JOBNAME").getInfo();
Creating a Workflow
One-time Workflow
As common use, one-time workflow will be the default workflow as user created. The first step is to create a WorkflowConfig.Builder object with workflow name. Then all configs can be set in WorkflowConfig.Builder. Once the configuration is done, WorkflowConfig object can be got from WorkflowConfig.Builder object. We have two rules to validate the Workflow configuration:
- Expiry time should not be less than 0
- Schedule config should be valid either one-time or a positive interval magnitude (Recurrent workflow)
Example:
Workflow.Builder myWorkflowBuilder = new Workflow.Builder("MyWorkflow");
myWorkflowBuilder.setExpiry(5000L);
Workflow myWorkflow = myWorkflowBuilder.build();
Recurrent Workflow
Recurrent workflow is the workflow scheduled periodically. The only config different from One-time workflow is to set a recurrent ScheduleConfig. There two methods in ScheduleConfig can help you to create a ScheduleConfig object: recurringFromNow and recurringFromDate. Both of them needs recurUnit (time unit for recurrent) and recurInteval (magnitude of recurrent interval). Here's the example:
ScheduleConfig myConfig1 = ScheduleConfig.recurringFFromNow(TimeUnit.MINUTES, 5L);
ScheduleConfig myConfig2 = ScheduleConfig.recurringFFromDate(Calendar.getInstance.getTime, TimeUnit.HOURS, 10L);
Once this schedule config is created. It could be set in the workflow config:
Workflow.Builder myWorkflowBuilder = new Workflow.Builder("MyWorkflow");
myWorkflowBuilder.setExpiry(2000L)
                 .setScheduleConfig(ScheduleConfig.recurringFromNow(TimeUnit.DAYS, 5));
Workflow myWorkflow = myWorkflowBuilder.build();
Start a Workflow
Start a workflow is just using taskdrive to start it. Since this is an async call, after start the workflow, user can keep doing actions.
taskDriver.start(myWorkflow);
Stop a Workflow
Stop workflow can be executed via TaskDriver:
taskDriver.stop(myWorkflow);
Resume a Workflow
Once the workflow is stopped, it does not mean the workflow is gone. Thus user can resume the workflow that has been stopped. Using TaskDriver resume the workflow:
taskDriver.resume(myWorkflow);
Delete a Workflow
Similar to start, stop and resume, delete operation is supported by TaskDriver.
taskDriver.delete(myWorkflow);
Add a Job
WARNING: Job can only be added to WorkflowConfig.Builder. Once WorkflowConfig is built, no job can be added! For creating a Job, please refer to the following section (Create a Job)
myWorkflowBuilder.addJob("JobName", jobConfigBuilder);
Add a Job dependency
Jobs can have dependencies. If one job2 depends on job1, job2 will not be scheduled until job1 finished.
myWorkflowBuilder.addParentChildDependency(ParentJobName, ChildJobName);
Schedule a workflow for executing in a future time
Application can create a workflow with a ScheduleConfig so as to schedule it to be executed in a future time.
myWorkflowBuilder.setScheduleConfig(ScheduleConfig.oneTimeDelayedStart(new Date(inFiveSeconds)));
Additional Workflow Options
| Additional Config Options | Detail |
|---|---|
| setJobDag(JobDag v) | If user already defined the job DAG, it could be set with this method. |
| setExpiry(long v, TimeUnit unit) | Set the expiration time for this workflow. |
| setFailureThreshold(int failureThreshold) | Set the failure threshold for this workflow, once job failures reach this number, the workflow will be failed. |
| setWorkflowType(String workflowType) | Set the user defined workflowType for this workflow. |
| setTerminable(boolean isTerminable) | Specify whether this workflow is terminable or not. |
| setCapacity(int capacity) | Set the number of jobs that workflow can hold before reject further jobs. Only used when workflow is not terminable. |
| setTargetState(TargetState v) | Set the final state of this workflow. |
Creating a Queue
Job queue is another shape of workflow. Here listed different between a job queue and workflow:
| Property | Workflow | Job Queue |
|---|---|---|
| Existing time | Workflow will be deleted after it is done. | Job queue will be there until user delete it. |
| Add jobs | Once workflow is build, no job can be added. | Job queue can keep accepting jobs. |
| Parallel run | Allows parallel run for jobs without dependencies | No parallel run allowed except setting ParallelJobs |
For creating a job queue, user have to provide queue name and workflow config (please refer above Create a Workflow). Similar to other task object, create a JobQueue.Builder first. Then JobQueue can be validated and generated via build function.
WorkflowConfig.Builder myWorkflowCfgBuilder = new WorkflowConfig.Builder().setWorkFlowType("MyType");
JobQueue jobQueue = new JobQueue.Builder("MyQueueName").setWorkflowConfig(myWorkflowCfgBuilder.build()).build();
####Append Job to Queue
WARNING:Different from normal workflow, job for JobQueue can be append even in anytime. Similar to workflow add a job, job can be appended via enqueueJob function via TaskDriver.
jobQueueBuilder.enqueueJob("JobName", jobConfigBuilder);
####Delete Job from Queue
Helix allowed user to delete a job from existing queue. We offer delete API in TaskDriver to do this. The queue has to be stopped in order for a job to be deleted. User can resume the queue once deletion succeeds.
taskDriver.stop("QueueName");
taskDriver.deleteJob("QueueName", "JobName");
taskDriver.resume("QueueName");
####Additional Option for JobQueue
setParallelJobs(int parallelJobs) : Set the how many jobs can parallel running, except there is any dependencies.
###Create a Job
Before generate a JobConfig object, user still have to use JobConfig.Builder to build JobConfig.
JobConfig.Builder myJobCfgBuilder = new JobConfig.Builder();
JobConfig myJobCfg = myJobCfgBuilder.build();
Helix has couple rules to validate a job:
- Each job must at least have one task to execute. For adding tasks and task rules please refer following section Add Tasks.
- Task timeout should not less than zero.
- Number of concurrent tasks per instances should not less than one.
- Maximum attempts per task should not less than one
- There must be a workflow name
Add Tasks
There are two ways of adding tasks:
- Add by TaskConfig. Tasks can be added via adding TaskConfigs. User can create a List of TaskConfigs or add TaskConfigMap, which is a task id to TaskConfig mapping.
TaskConfig taskCfg = new TaskConfig(null, null, null, null);
List<TaskConfig> taskCfgs = new ArrayList<TaskConfig>();
myJobCfg.addTaskConfigs(taskCfgs);

Map<String, TaskConfig> taskCfgMap = new HashMap<String, TaskConfig>();
taskCfgMap.put(taskCfg.getId(), taskCfg);
myJobCfg.addTaskConfigMap(taskCfgMap);
- Add by Job command. If user does not want to specify each TaskConfig, we can create identical tasks based on Job command with number of tasks.
myJobCfg.setCommand("JobCommand").setNumberOfTasks(10);
WARNING: Either user provides TaskConfigs / TaskConfigMap or both of Job command and number tasks (except Targeted Job, refer following section) . Otherwise, validation will be failed.
Generic Job
Generic Job is the default job created. It does not have targeted resource. Thus this generic job could be assigned to one of eligble instances.
Targeted Job
Targeted Job has set up the target resource. For this kind of job, Job command is necessary, but number of tasks is not. The tasks will depends on the partion number of targeted resource. To set target resource, just put target resource name to JobConfig.Builder.
myJobCfgBuilder.setTargetResource("TargetResourceName");
In addition, user can specify the instance target state. For example, if user want to run the Task on “Master” state instance, setTargetPartitionState method can help to set the partition to assign to specific instance.
myJobCfgBuilder.setTargetPartitionState(Arrays.asList(new String[]{"Master", "Slave"}));
Instance Group
Grouping jobs with targeted group of instances feature has been supported. User firstly have to define the instance group tag for instances, which means label some instances with specific tag. Then user can put those tags to a job that only would like to assigned to those instances. For example, customer data only available on instance 1, 2, 3. These three instances can be tagged as “CUSTOMER” and customer data related jobs can set the instance group tag “CUSTOMER”. Thus customer data related jobs will only assign to instance 1, 2, 3. To add instance group tag, just set it in JobConfig.Builder:
jobCfg.setInstanceGroupTag("INSTANCEGROUPTAG");
Delayed scheduling job
Set up a schedule plan for the job. If both items are set, Helix will calculate and use the later one.
myJobCfgBuilder.setExecutionDelay(delayMs);
myJobCfgBuilder.setExecutionStart(startTimeMs);
Note that the scheduled job needs to be runnable first. Then Helix will start checking it's configuration for scheduling. If any parent jobs are not finished, the job won't be scheduled even the scheduled timestamp has already passed.
Additional Job Options
| Operation | Detail |
|---|---|
| setWorkflow(String workflowName) | Set the workflow that this job belongs to |
| setTargetPartions(List<String> targetPartionNames) | Set list of partition names |
| setTargetPartionStates(Set<String>) | Set the partition states |
| setCommand(String command) | Set the job command |
| setJobCommandConfigMap(Map<String, String> v) | Set the job command config maps |
| setTimeoutPerTask(long v) | Set the timeout for each task |
| setNumConcurrentTasksPerInstance(int v) | Set number of tasks can concurrent run on same instance |
| setMaxAttemptsPerTask(int v) | Set times of retry for a task |
| setFailureThreshold(int v) | Set failure tolerance of tasks for this job |
| setTaskRetryDelay(long v) | Set the delay time before a task retry |
| setIgnoreDependentJobFailure(boolean ignoreDependentJobFailure) | Set whether ignore the job failure of parent job of this job |
| setJobType(String jobType) | Set the job type of this job |
| setExecutionDelay(String delay) | Set the delay time to schedule job execution |
| setExecutionStart(String start) | Set the start time to schedule job execution |
Monitor the status of your job
As we introduced the excellent util TaskDriver in Workflow Section, we have extra more functionality that provided to user. The user can synchronized wait Job or Workflow until it reaches certain STATES. The function Helix have API pollForJobState and pollForWorkflowState. For pollForJobState, it accepts arguments:
- Workflow name, required
- Job name, required
- Timeout, not required, will be three minutes if user choose function without timeout argument. Time unit is milisecond.
- TaskStates, at least one state. This function can accept multiple TaskState, will end function until one of those TaskState reaches.
For example:
taskDriver.pollForJobState("MyWorkflowName", "MyJobName", 180000L, TaskState.FAILED, TaskState.FATAL_FAILED);
taskDriver.pollForJobState("MyWorkflowName", "MyJobName", TaskState.COMPLETED);
For pollForWorkflowState, it accepts similar arguments except Job name. For example:
taskDriver.pollForWorkflowState("MyWorkflowName", 180000L, TaskState.FAILED, TaskState.FATAL_FAILED);
taskDriver.pollForWorkflowState("MyWorkflowName", TaskState.COMPLETED);
Task framework monitoring metrics
Please refer to following links.